Countries
Cities / Towns
Provinces / States
Template Types
Templates
Phone Number Types
Referral Methods
Credits
Payment Types
Payment Frequency
Sticky Notes
The CA screen in Atlas offers many different options to assist in daily tasks. To ensure these tasks run smoothly, with minimal interruptions, we recommend taking a few minutes and setting up some specific screens before continuing.
NOTE: these details can be skipped over and referred back to later in the Manual. Some of the information presented here can be configured during normal operation, as you are using the system.
![]() You will notice a Menu Icon for some headings. This icon will direct you through theMenu selections to access the information or screen being discussed.
You will notice a Menu Icon for some headings. This icon will direct you through theMenu selections to access the information or screen being discussed.
Patient Types
![]() Setup > Initial Setup > Patient Types
Setup > Initial Setup > Patient Types
Patient Types can be used to organize your patient database into Groups, without affecting the patient billing. Patient Types can be used to breakdown your Accounts Receivable report, Patient Lists and more.
- To create a new Patient Type – click ADD
- To change an existing Patient Type – click EDIT
- Click SAVE to save any changes.
NOTE: To finalize setup for Patient Types - your patients will need to be linked to a Type. See Patient Edit for details on this procedure.
![]() Setup > Initial Setup > Countries
Setup > Initial Setup > Countries
Country names used in Atlas can be customized to your geographic location and to standardize this input from user to user. Specific Countries will be linked to Specific Cities/Towns in the next section.
- Country: name of Country
- Postal Code Mask: default format of local Postal or Zip code
- Postal Code Label: specific name for Postal or Zip code in your area (regionalized)
- Province Label: specific name for Province or State in your area (regionalized)
- Phone Number Mask: default format for Phone Number on patient files
Be sure to click SAVE when complete
![]() Setup > Initial Setup > Cities/Towns
Setup > Initial Setup > Cities/Towns
City and Town names used in Atlas can be customized to your geographic location and to standardize this input from user to user. This list will be available in the Patient information screen.
This information can also be configured ‘on the fly’ when you are entering or Editing a Patients’ information screen. See the section on Patients)
- Name: name of City or Town you are entering
- Province: name of Province (or State)
- Country: name of country – see Countries section to edit or press F12 on your keyboard to enter the Country edit window
- Default Postal Code: default postal (zip) code for city or town
Be sure to click SAVE when complete
![]() Setup > Initial Setup > Provinces / States
Setup > Initial Setup > Provinces / States
Provinces and States used in Atlas can be customized to your geographic location to help standardize input from user to user.
- Prov Code: abbreviation for Province (State)
- Province: name of Province (State)
- Country: country of Province (State)
Be sure to click SAVE when complete
![]() Setup > Initial Setup > Template Types
Setup > Initial Setup > Template Types
When creating documentation or emails for patients, you can set templates to make creation easier and faster. These templates can be pre-filled with patient information using ‘tokens’ in Atlas. Different template types perform different functions – allowing certain templates to be for email, others for standard Documents and yet another to be a ‘fillable document’.
Atlas has created a few specific template types by default that can be used or modified as needed. Normally this default list is sufficient for most clinics.
- Email: is for email body/subject templates. NOTE: the checkbox EMAIL makes the template perform as an email (that is giving an area for subject, recipients, attachments, etc)
- Documents: can be attached to patient files in the VTC
- SMS: text messaging template
- Fillable Document: documents
To view discontinued template types, click the Show Discontinued button
![]() Setup > Initial Setup > Templates
Setup > Initial Setup > Templates
See Section above for description of Templates and how to add different Template Types, as needed.
When creating templates, be sure to use Atlas Tokens to personalize each message being sent out. Tokens allow you to automatically insert a Patient Name, Appointment or Provider Name into each message.
To create a Template:
- Name: descriptive name for the template
- Type: template type - chosen from dropdown menu – determines what attributes will be available to configure in Template
- Inactive: check this box if the template is no longer being used
- Use File: allows you to use a specific file (Word document, etc) for template
- Subject: (displays for Email template) – subject line for template
- Attachment: (displays for Email template) – shows files attached to email template To attach a file, click in the Text Box and navigate to desired file
- Width: maximum width (in characters) for template (72 is standard)
- Form: body of email / body of text in template: here is where the Tokens (on right) should be entered if needed. Each token will be replaced with the appropriate information when the template is used In the image example: the token ^PN would input the patients full name into the email
Be sure to click SAVE when complete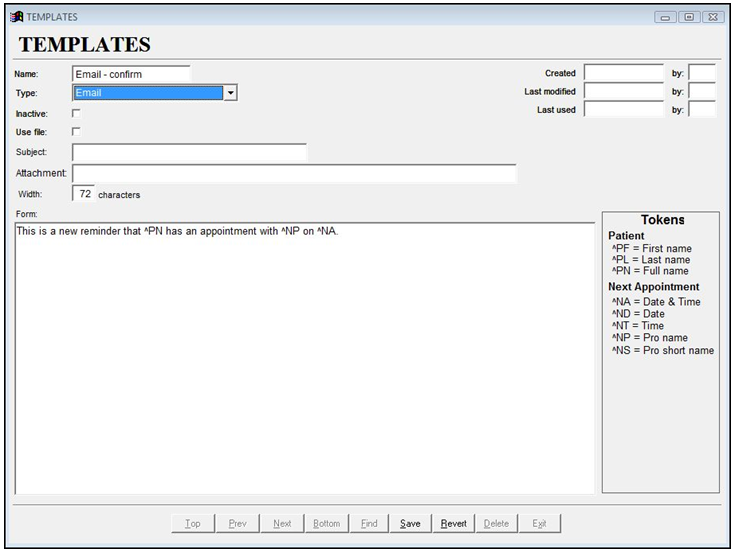
NOTE: if you choose Document as the template type, you are presented the option to format the body of the document.
Also note, in the upper right corner you can see when the template was created and when it was last modified.
When entering a phone number into a Patient record, you can enter multiple phone numbers such as cell, home and business. To setup phone number types not falling into these categories use this window. What other types of phone numbers? – I have no idea; maybe Home 2 or Spouse Cell, you decide?
![]() Setup > Initial Setup > Referral Methods
Setup > Initial Setup > Referral Methods
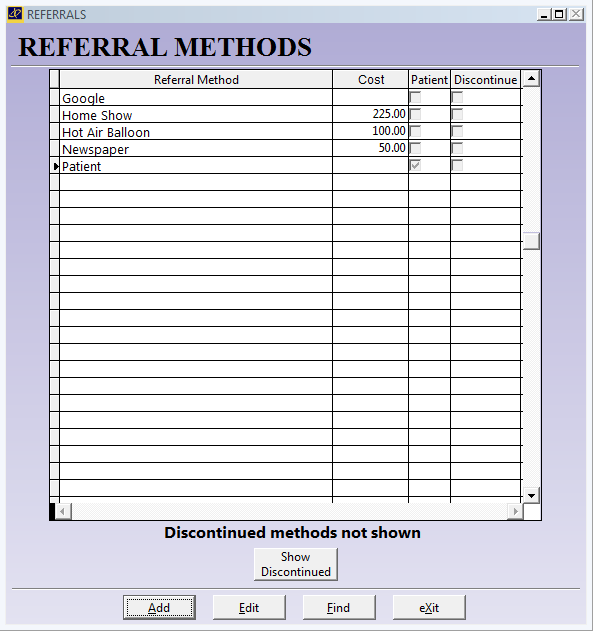 Setup > Initial Setup > Referral Methods Atlas allows tracking referral methods from patients. To create a new referral method click ADD in this window. If the method is checked ‘Patient’, when you use the specific method, it will prompt with your list of current patients for selection. This is useful to keep your actual referral list small but still allow proper tracking of referrals. If you are no longer using a referral method (ex: the promotion is over) you can discontinue by clicking the checkbox. This will hide the Referral Method from your list of options, but still leave it in the database for reports and searching. Users can also enter a 'cost' for the referral method to help determine the Return on Investment later when producing reports.
![]()
Setup > Initial Setup > Credits
Atlas has built into the system a CREDIT and a DISCOUNT option for transactions. These allow reductions to a Service or Inventory item price (such as in the case of a coupon or gift certificate)
If you need to specify the Credit, use this box.
Type in a short reason (or description) and the Default Amount for the Credit/Discount.
NOTE: the default amount can be $0.00 and then be filled in at the time of transaction.
There are more details available on this function in the Transactions section.
![]()
Setup > Initial Setup > Payment Types
Atlas has built into the system are a few different options for Payment Type (such as CASH, CHECK, MASTERCARD, VISA, etc) if you accept payment methods other than those available, click ADD to create a new one (ex: American Express)
- Payment Type Description: description of payment type that displays on dropdown menu in transaction screen
- Detail: opens the detail box on a Transaction for check number, short note, etc
- Post Date: allows payment method to be used for post dated payments
- Drawer Code: groups Payment Type with other similar Types (i.e: Visa with Credit Cards)
- Report: displays payment type on CASH reports
- Auto Fill : works in conjunction with our Fast Transaction entry feature to quickly populate the Payment screen with default information
NOTE: payment descriptions in red cannot be changed; these are coded into the system
![]()
Setup > Initial Setup > Payment Frequency
The Payment Frequency window allows the user to configure a specific timeframe for when Post Dated payments can be scheduled for. By default, you can schedule for Monthly or Weekly – however, in some situations a patient may have to be set on a bi-weekly payment schedule.
Be sure to configure the correct # of Days for your payment schedule.
You can use the arrows on the right side column to move the Payment Frequency up or down in the available menu.
![]()
Utilities > New Sticky Note
Sticky notes can be used in Atlas to keep lists, reminders and more. Sticky Notes have multiple features as outlined below.
After opening a Sticky Note you can simply left click inside the note and begin typing your information.
Right click in the sticky note for options:
- Delete: removes the sticky note from the system.
- Attach to Patient: attaches the current sticky note to the currently active patient file. This sticky note will only appear when the specific patient file is opened on the CA screen.
- For this User Only: attaches the current sticky note to the currently logged in user. This sticky note will only appear when the specific user logs into Atlas
- Change Background / Foreground: allows you to change the background and text color.
NOTE: sticky notes can be resized like other windows (click and drag the edges), they can be minimized to hide out of the way and they can be moved around the screen.
If you need to display all ‘displayable’ sticky notes (that is ones not assigned to patients or specific users) click SHOW ALL STICKY NOTES under the Utilities button.
To completely remove a Sticky Note from your system:
Right Click in the Sticky Note and choose DELETE. Clicking the X on the note will only hide it from the current view until the next event that triggers the note displays it again.